Thursday, March 16, 2017
St. Patrick's Day drawings and cards, my crayon stencil style leprechauns
And my recent Irish Blessing card as a frenchfold or single fold.
Tuesday, March 14, 2017
Irish Blessing to color for St. Patrick's Day
Write the blessing in my tablet's drawing app using the / slash 'nib'. I wrote it in green and completely forgot about using uncial lettering. This is hand lettered. Upload to an online image editor and convert to black and white. Find another online image editor that converts photos to coloring pages. Usually that conversion does not work well on my images but in this case I wanted the lettering to lose the insides. That worked well.
The lettering took up so much space that there is no real place for decoration. But you have a lot of letters to color! I hope this can print out nicely as a gif file. I will later put it in pdf form. And, here it is, a pdf on my Etsy - Irish Blessing coloring page pdf a $1.50 download.
Tulip bouquet botanical illustrations by Alexander Marshall
And, this blog author apparently is posting a daily Madonna and child art piece of long ago. I suppose there must be plenty out there from all the handmade books made through the centuries before Gutenberg and his printing press revolutionized the possibilities of spreading the written word, (and image).
https://bjws.blogspot.com/2017/03/economics-in-garden-1600s-watercolors.html
Monday, March 13, 2017
St. Patrick's Day greens play, celtic designs, motifs, Adult art class 3/13/17
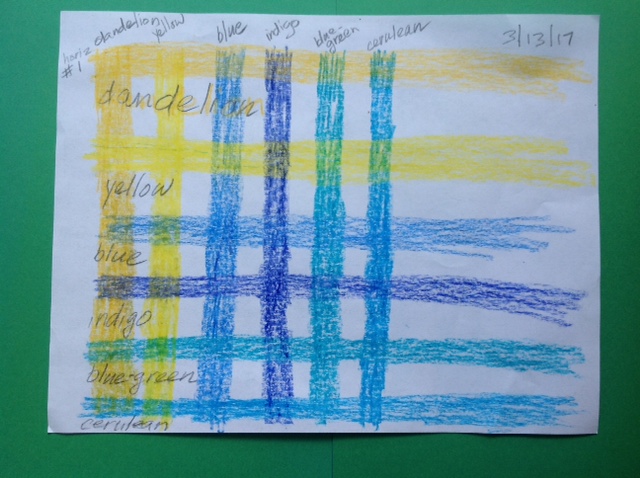
In advance of St. Patrick's Day, we explored making greens using the yellows and blues in a box of 24 Crayola crayons. Woe unto those who have big boxes of crayons! Only the colors from the 24 set allowed. So - yellow, dandelion, blue, indigo, blue green, and cerulean.
Working across the length of the paper, draw a stripe of each color, labeling each color as you go. Do it as you go so you don't get mixed up. Now do the same with vertical stripes. Note on your paper that you have done horizontals first followed by the verticals next. This is so that the next time you look at this sheet you will know how you did it. This is a study that gives you a chart of green possibilities possible with that box of crayons. We forgot to write that bit of info down! You can see differences also just in the way individuals press down on their crayons. We are assuming that we can see the different effects from which color goes down first. We are quite sure that we have done both ways here.
Then we worked on card stock and folded up a generous equal width border. Do a horizontal fold first. The horizontal fold is easier to make parallel because it is going with the grain of the paper. You must make sure that short edges should line up along the perpendicular edge. Now, how do you measure the perpendicular edges so they are the same width?
At the intersection of the fold and the perpendicular edge, fold that short section back onto the long fold. You now have a measure for an equal width perpendicular. Fold that perpendicular edge back along that measurement. How do you make sure it is perpendicular? By making sure the first fold little section is lying/lined up along itself. Repeat this procedure for opposite side. Then do the remaining edge.
You will have four corner boxes with only one diagonal in them. Fold criss-crossing diagonals in these corner squares. You now have a built in design to start you off. Decorate the frame using as simple or complex designs as you wish but work with your newfound green inventions. In the center panel draw what you wish for St. Patrick's Day.
You can reference the sheet of celtic design samples that Dover Books sent out years ago. They are stencil designs. Keep your print-out small as this is a low-res image.
Friday, March 10, 2017
Dogsled team papercut toys, demo drawings.
Dog sled teams drawings and folded papertoys, kids' and adults drawing classes, 3/06 &7/17
In honor of the Iditarod dogsled race which started this past weekend, we do a session every year.
Adult class had to come up with a list of practice exercises as I scribbled them down on a piece of paper. I cut apart the list. There were perhaps 16 ideas. From there, 4 students each pulled out a slip. I read them off. I did however decide what order we would do them in.
a) blind contour drawing
b) continuous line drawing
c) draw the shapes you see - the negative shapes
d) there was one option that I changed my mind about. Now I don't remember what that was, or what I changed it to.
Our final drawings were also continuous line but then use that for coloring.
After we finished, one student suggested we do a session where we put one reference photo, of whatever that day's subject, through several different exercises. I am still not quite clear. I think this means to limit the exercises to apply them to the same reference source each time.
The kids' class, which was both kids and adults, we made a papertoy dogsled team. Fold a sheet of paper in half lengthwise. fold up a 1/2" edge/lip along the existing fold edge. Then we drew dog figures created by drawing rectangles and triangles. Class drew along with me. There is plenty of leeway in how to draw these dogs.
Draw tabs or merry-go-round poles coming up from the dogs' backs. These will eventually get glued over each other to keep the dog pairs standing up rather than flapping over. The flap along the bottom fold gets spread out to keep the dogs separate. We experimented with how we could trace the dogs we had drawn onto the other side of the folded paper. I have yet to solve that. Color the team before you cut out the figures. If you were to cut out first, it would be too hard to color. Better to color first and then cut out. It is ok to cut out very simply.
Some of our visitors were here for mid-winter break and staying in a hotel. They asked to take a piece of paper so they could try to make the sled too. Yes, of course! I did not think fast enough to offer more paper. I hope they were able to find more supplies at the hotel.
Wednesday, March 1, 2017
Mardi Gras Masks, kids' and adult drawing classes art displays, 2/27 & 2/28, 2017
In each class we drew freehand templates on half sheets of folded paper. Then we used them as tracers. Adult class students kept their mask designs as whole larger drawings. Kids' class students decorated their traced masks and then cut them out. Adults in kids' class had to work quickly on their masks so they could also become a stick factory and roll up paper for the mask/lunette sticks.
Kids' class: Note the mask decorated with figures illustrating all the sports that child has tried. Another is a Spider Man. Whether adult or young child, making foldover templates get us topsy-turvy over how to cut so that one winds up with one piece rather than two separate pieces. I tried arguing with one young person over how one could solve the problem of how to make one piece rather than two. Tape or glue was not the answer I wanted. Only later did I understand that I meant "figure out how to make it as one whole piece the NEXT time", but the child wanted to join the two pieces in hand to make one whole mask. Only later did I see that 'Of course those would need to be joined by some fastener like tape or glue.' Oh how blind this teacher can be!